Release 2021.02
Accounting
Default GL Accounts for Tax Records
The Default Product Type GL Accounts setting in the business unit allows accounting admins to specify accounts to auto-populate when prices for certain product types are created. The option to set up Default Product Type GL Accounts for taxes is now available.
To configure Default Product Type GL Accounts:
-
Navigate to the Accounting App > Setup.
-
Open the desired Business Unit.
-
In the Business Unit Record, click the Setup tab.
-
Click the Default Product Type GL Account menu option.
-
Click Add New Default Product Type GL Account.

In the Product Type drop-down field, the option to select Tax is now available. When new tax records are configured under the Products App > Setup > Taxes. The tax accounts set up in the business unit will auto populate.

Link from Price Record to Price Attribute Group
Within the Price Record > Set Up tab > Attribute Groups menu option, listed price attributes are now linked to the Price Attribute Group Record.

This allows users to quickly navigate to the price attribute configuration to verify or edit settings as necessary.

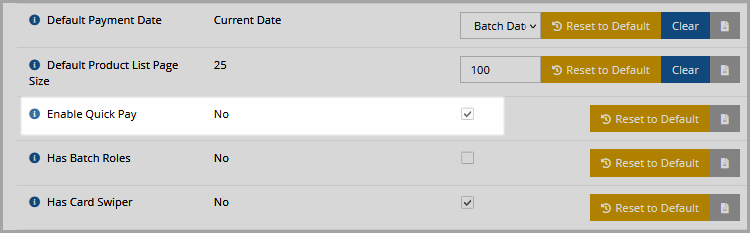
Payment Date Customization Setting
“Payment date” can be configured to correspond to the date on which payment was applied OR to the batch date.
This setting is accessible in the Configurations App > Settings > Shopping section, using the Default Payment Date drop-down field.
Options include:
-
Current Date: (default setting) sets the payment date as the date on which payment was applied.
-
Batch Date: sets the payment date as the batch date.

When Default Payment Date is set to “Batch Date,” staff checking out on behalf of members will see the option to Use Batch Date or Use Current Date on the final stage of the checkout process. Clicking this link auto-populates the payment date field.
Note: The “Use X Date” option only appears in checkout for staff users when using wire transfer, telecheck, or check payment options.

“Exclude All” Option Scheduling AutoPay Process
When scheduling the Auto Pay process, staff now have an easy way to “exclude all” records to be included in the auto pay.
This feature is visible in the Processes App > Process Center > Ecommerce.AutoPay job.

Payment Import–Loading Previous Mappings
This feature is available in the Accounting App > Payment Import feature > With Product Mapping.
Once a payment file is uploaded, the option to Select Mappings appears. This drop-down field lists previous imports with unique mappings.
Column headers for mappings in the current Excel spreadsheet must match those chosen in the Select Mappings drop-down field.

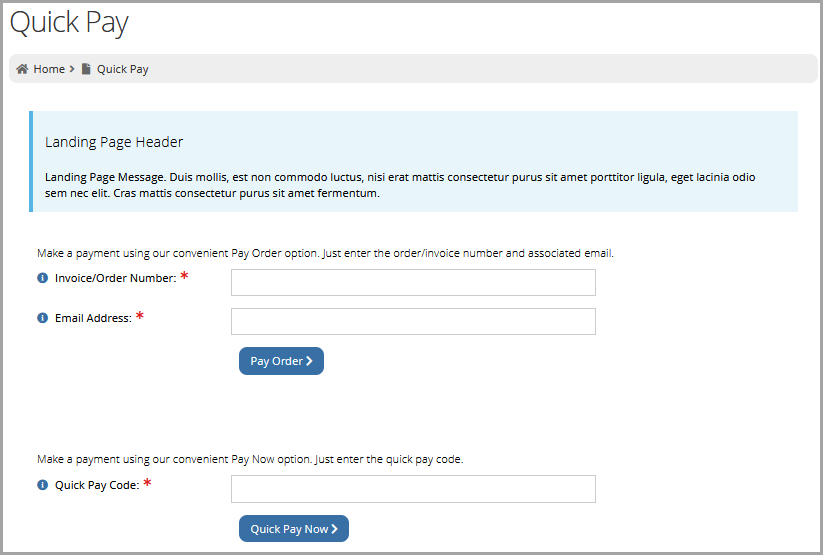
Quick Pay Web Feature
Quick Pay allows users to make a payment without logging into the system. This option must be enabled in the Configurations App and configured in a web page. Visitors to that web page can then submit a payment using a quick pay code OR by entering the order/invoice number they wish to pay.
Enabling Quick Pay:
-
Navigate to the Configurations App > Settings > Shopping section.
-
Locate and enable the Enable Quick Pay check box.
-
Save changes.
When Quick Pay is enabled, orders and invoices will display a quick pay link, as well as a quick pay code.
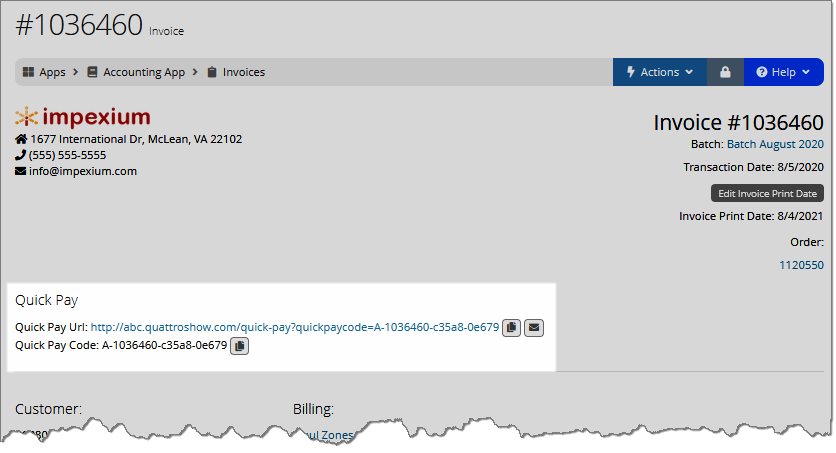
In the Invoice pictured above, note the Quick Pay URL—the copy and email icons allow staff to quickly share a link to pay that invoice without logging in. The Quick Pay Code alone can also be copied and shared with an anonymous payer.
Configuring the Quick Pay Web Page:
-
Navigate to the Web Sites App > Web Sites feature.
-
Click the New Page button.
-
In the newly created page, configure necessary Page Settings and Page Visibility, as normal.
-
In the Page Content tab > Main Layout section, click the Add button to add a new item of web content to the page.
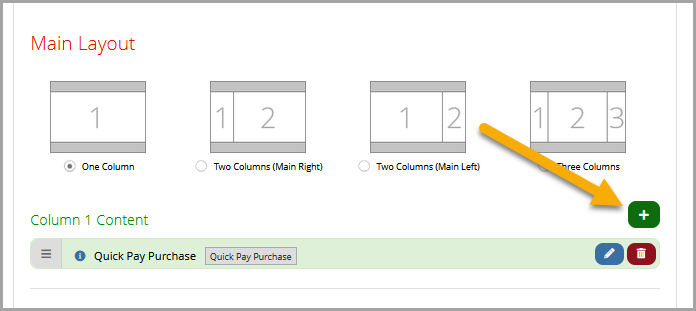
-
In the Add Content window,
-
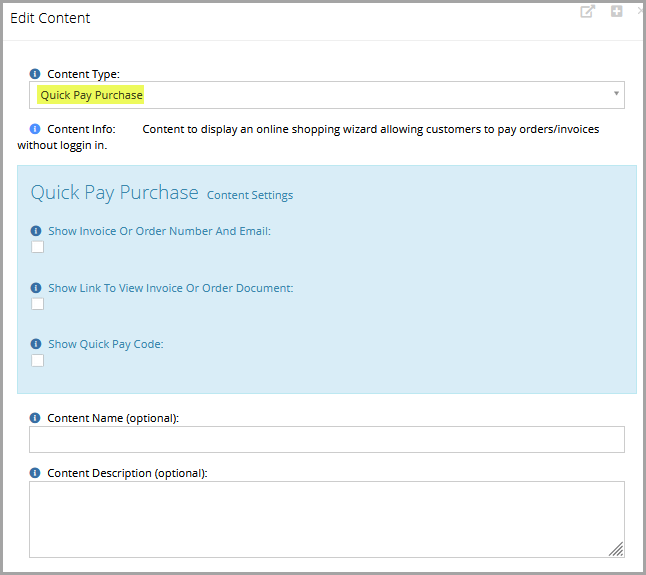
In the Content Type drop-down field, select Quick Pay Purchase. The following options are available:
-
Show Invoice or Order Number and Email: Enables a field allowing the user to choose an order or invoice to pay by entering the order or invoice number and the email address associated with the account.
-
Show Link to View Invoice or Order Document: Once the payment is made, enabling this option allows the user to click a link opening the Order or Invoice Record.
-
Show Quick Pay Code: Enables a field allowing the user to enter a quick pay code, obtained from the Order or Invoice Record.
To use this functionality, at least one option—Show Invoice or Order Number and Email and/or Show Quick Pay Code—must be enabled.
-
-
Click Save.
-
-
Save and Publish the page.
Using the Quick Pay web page:
-
To use the Quick Page web page, on the Web Page > Page Content tab, click the View Live Page button or navigate directly to the page URL. In the published page,
-
If the Show Invoice or Order Number and Email setting was enabled, a section will appear allowing a user to enter an Invoice/Order Number and the Email Address of the purchaser.
-
If the Show Quick Pay Code setting was enabled, a section appears allowing a user to enter a Quick Pay Code to make their payment.
-
-
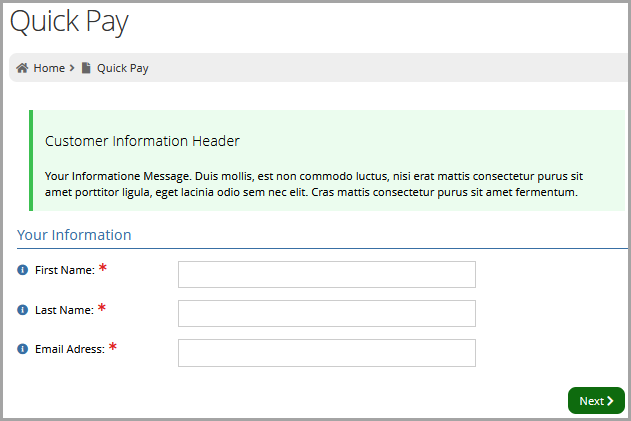
Depending on how the page is configured, the user can enter the Invoice/Order Number and the Email Address associated with the order OR the Quick Pay Code (which is visible at the top of the Order and Invoice Records).
If both are enabled, the user is required to complete only one of these sections.
-
Click through to the next step. The payer is required to enter their First and Last Name and Email Address. If the email address already exists in the system, the payment will be associated with that user. If not, a new customer record is created for the payer.
-
Click Next.
-
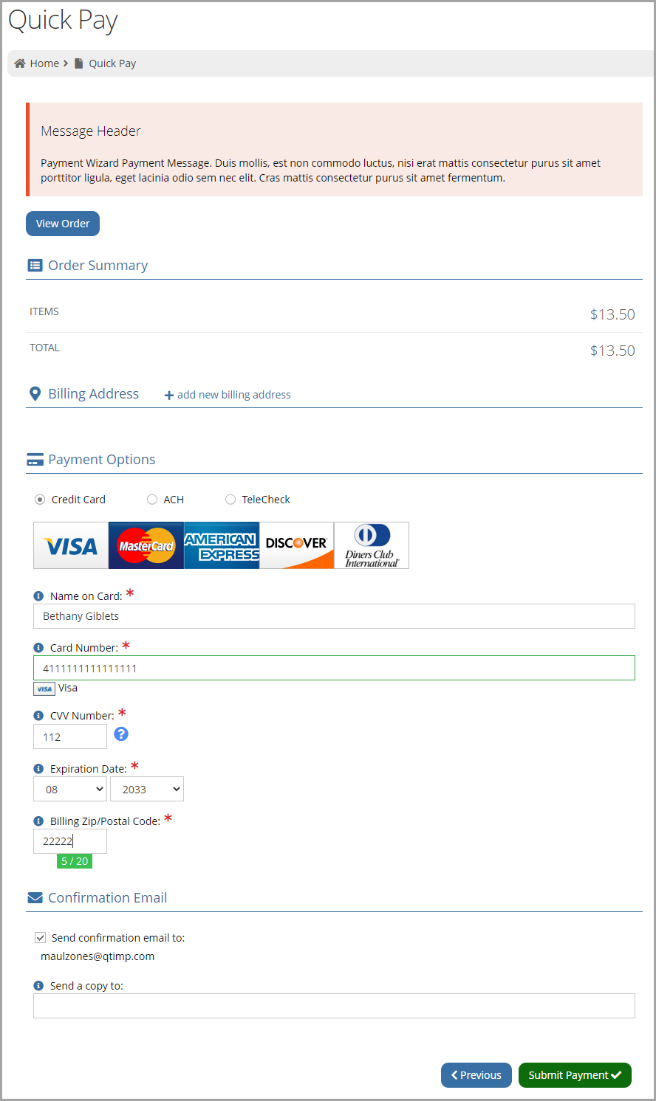
On the final stage of checkout, the payer submits their payment information and completes the payment.
Autopay Setting Enhancement
In the Configurations App, the Default Autopay setting allows for the autopay setting to automatically be enabled during checkout for users with a saved credit card.
This setting now offers more options via a drop-down menu, including:
-
No (default): Autopay is not auto enabled.
-
For All Purchases: Autopay is auto enabled for all purchases.
-
For Installments Only: Autopay is auto enabled for installment purchases only.
-
For Non-Installments Only: Autopay is auto enabled for non-installment purchases only.
-
If Purchase Contains Installments: Autopay is auto enabled for the entire purchase containing a product being paid via installments.
-
If Purchase does not Contain Installments: Autopay is auto enabled for any purchase that does not contain a product being paid via installments.
Clients with Default Autopay set to “true” prior to the upgrade will automatically have “For All Purchases” selected in the new drop-down.
Enabling the Require Auto Pay setting requires users with a saved credit card to enroll in autopay. Settings in this drop-down menu include:
-
No (default)
-
For All Purchases
-
For Installments Only
-
For Non-Installments Only
-
If Purchase Contains Installments
-
If Purchase does not Contain Installments
Avalara Enhancements
Impexium can integrate with Avalara tax-compliance software, allowing exact taxes to be pushed to Impexium and for transaction information to be visible in Avalara.
Enhancements in this section apply only to clients using an Avalara subscription service and integration. For clients interested in setting up this integration, please contact clientsuccess@impexium.com.
For more in the Avalara integration, please see the help topic: Using the Impexium Avalara Integration
Support of Refund & Writeback to Avalara
When a transaction in Impexium is refunded, that information is also written back to and visible in Avalara. This data includes:
-
Invoice number
-
Customer record number
-
Ship from and to
-
Tax amount
When a refund is created in Impexium, that refund is pushed to Avalara as a new line item called “return invoice.” Values in this area appear as negative values.
SalesTax Badge Certification
Impexium is now Avalara-certified with their sales tax badge.
Admin
Power Automate Connector—Enhanced Triggers & Actions
The Impexium Power Automate connector has 4 new triggers:
-
Committee member updated.
-
Customer email updated.
-
Customer request updated.
-
Purchase canceled.
Many actions have been added to the Power Automate Connector:
-
Mark registrant as attended.
-
Update committee member.
-
Add education credit to individual.
-
Find organization (ID/Record Number).
-
Look up individual.
-
Lookup Organization.
-
Add note to the Customer Record.
-
Add award nomination.
-
Update award nomination.
-
List award recipient.
Webhook—Purchase Paid
Webhook that fires when a product is fully paid. (Supports courses, events, exams, funds, sessions, memberships, merchandise, and publications.)

Awards
Navigate Between Customer Record & Nominee Record
On the Nominee Record, a link is now available allowing quick navigation to the nominee’s and the nominator’s Individual Records.
This feature is visible in the Award Record > Nominees tab, in the Nominee Record > Overview tab.

Certification
Require Document Submission with Application
A certification application can be set to require users to submit a required document at the time of application.
This configuration can be enabled in the Application Record > Requirements tab.
To enable this setting:
-
Navigate to the Application Record > Requirements tab.
-
Add or edit a Requirement Type, “Document Submission.” In the Requirement Setup form,
-
Enter a Description.
-
Ensure that Required for Application Submission check box is clicked.
-
Save.
-

Submitting an application with a required document:
On the first step of the application process, the document configured to be required for application is flagged as “required” using a red asterisk. If the user attempts to proceed without uploading the required document, an error message will appear prompting them to complete the upload.

Customers
View Password on Login Page
When entering their password, users can click the View Password icon to see the characters entered in the password field.
This feature is also visible in other areas, such as the Change Password field.

Cached Data Displays an Updated “As Of” Date
In areas displaying cached table data, the “as of” date indicates the date on which the data was last updated.
To ensure Impexium is as fast as possible, a small percentage of the data you see onscreen is cached. Most of the data displayed onscreen is not cached and comes directly from the database. Cached data is typically pulled from the database from an hour to a day ago and now displays the “as of” date indicating when it was last refreshed.

Emailing to Multiple Addresses
In areas where an email address can be entered—such as when sending a copy of a confirmation email—multiple email addresses can be entered and separated by commas.

Detailed Data Captured in the Change Log
In the Customer Record > Account tab > Additional Info menu option, a beta version of the Change Logs tab is now available, showing a detailed list of the types of changes made to the record.

Memberships
Auto Pay Filter in Membership Mass Renewal
The Mass Membership Renewal allows staff to specify the auto pay status of members to include in the mass membership renewal process.
-
Navigate to the Mass Membership Renewal form. Begin completing the form as normal.
-
Note the Select members drop-down. There are three options:
-
All: All members meeting the criteria of the renewal will be included, regardless of their auto pay status.The Process Auto Pay? check box is selectable for users wishing to process automatic payments immediately.
-
Only Autopay: Only members who have opted to use auto pay will be included in the renewal.The Process Auto Pay? check box is selectable.
-
Without Autopay: Only members who do NOT use auto pay will be included. The Process Auto Pay? check box is greyed out and not selectable.
-

Products
Enhanced Custom Confirmation Emails
Staff can use Advanced Product Confirmation Email options to customize confirmation messages based on the following payment statuses:
-
Bill Me
-
Fully Paid
-
Partially Paid
Note: These email settings are specific to the order confirmation email, which goes out once when the order is placed. Although these settings are driven by the selected payment statuses, they do not affect the payment confirmation email itself, which is sent each time a payment is made.
This setting is accessible across all product types in the Product Record > Details tab > Email Templates. Click the Send Advanced Product Confirmation Email check box to access these options.
In the case of Membership Records, when this setting is enabled the Advanced Renewal Confirmation Email tab is also visible (seen below).

Queries
Query Result Aggregation
In the Query Builder, “aggregation” is the process of performing a calculation on a set of data and returning a single value.
Using this feature, a query can be created to show the aggregate number of records matching query criteria. This functionality is accessible in the Query Builder > “Step 3 – Select Result Fields.”
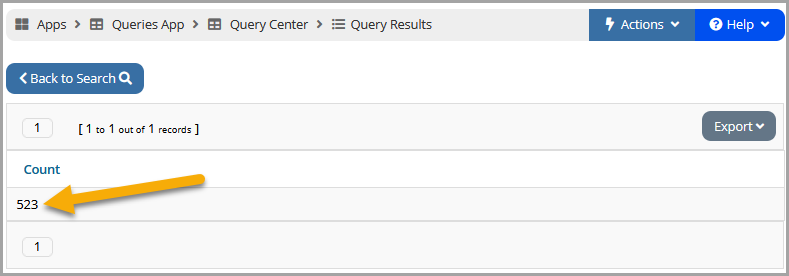
Returning a Single Aggregate Value
This setting returns a single line showing the total number of records matching query criteria.
To configure:
-
Navigate to the Query Builder. Begin building a new query or select an existing one.
-
Proceed to Step 3.
-
Locate the Add Count (Number of Results) icon
 .
.
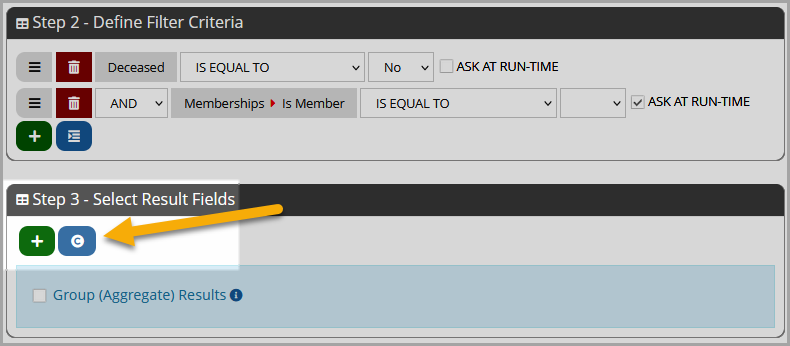
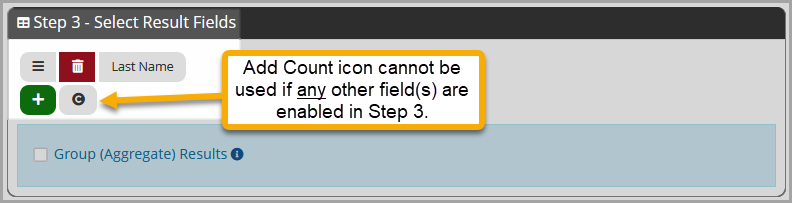
Note: No other ungrouped result fields can be used when Add Count (Number of Results) is enabled. In the image below, the “Last Name” field was added and Group (Aggregate) Results is not enabled—as a result the Add Count (Number of Results) icon is not selectable.
-
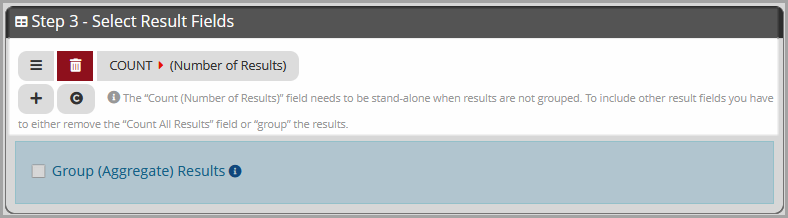
Ensure no other result fields are added.
-
Click the Add Count (Number of Results) icon
.
-
Complete the final steps of query setup.
-
Save and run the query. The result is a single line showing the aggregate number of records matching the criteria submitted.
In the example below, the query returns the total number of individual members in the system: 523.
Aggregate Results by Data Type
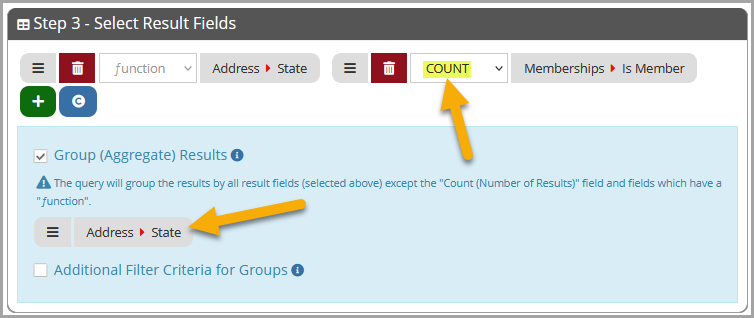
The Group (Aggregate) Results setting allows a user to see total results by a particular data type. Mathematical functions can then be applied to each “group” to get additional data.
One use case for this functionality is to display a list of states and the number of members in each state.
The Group (Aggregate) Results setting is accessible in the Query Builder > Step 3.

-
In Step 3, add desired result fields.
-
Click the Group (Aggregate) Results check box.
The system automatically includes all fields set up under Step 3 as data points by which the results should be grouped. (See the image, above.)
Next, you will need to specify by which data results should be counted.
For example, to count the number of members by state, the Group Results setting should be set to group by Address > State and count by Memberships > Is Member.
-
Set the value to be counted by selecting COUNT in the function drop-down next to that result field.
That field is automatically removed as a group-by field.
Note: Some result fields, such as numerical or date fields, display options in addition to COUNT, including AVERAGE (displaying a numerical average), SUM (sum of values), MIN (minimum value), and MAX (maximum value).

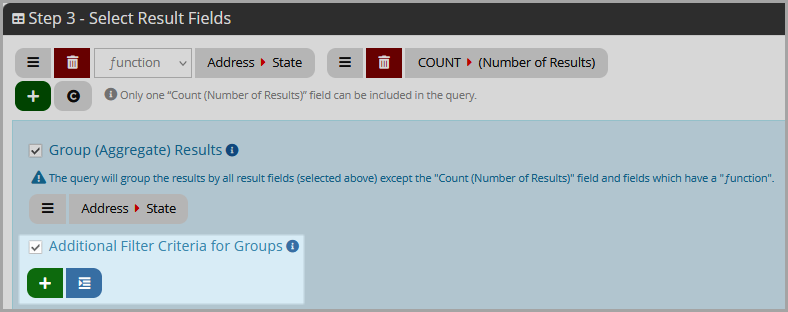
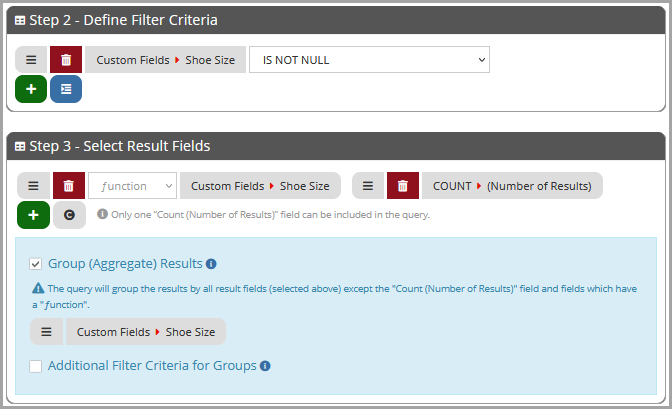
Applying Filter Criteria to Grouped Results
When the Group (Aggregate) Results setting is enabled, users will also see the option to add Additional Filter Criteria for Groups.
Enabling this setting allows inclusion of filter fields in grouped results and can be used in conjunction with the Add Count (Number of Results) function .
To add filter criteria to grouped results,
-
In Step 3 of the query builder, add result fields.
-
Enable the Group (Aggregate) Results option.
-
Enable the Additional Filter Criteria for Groups option.
-
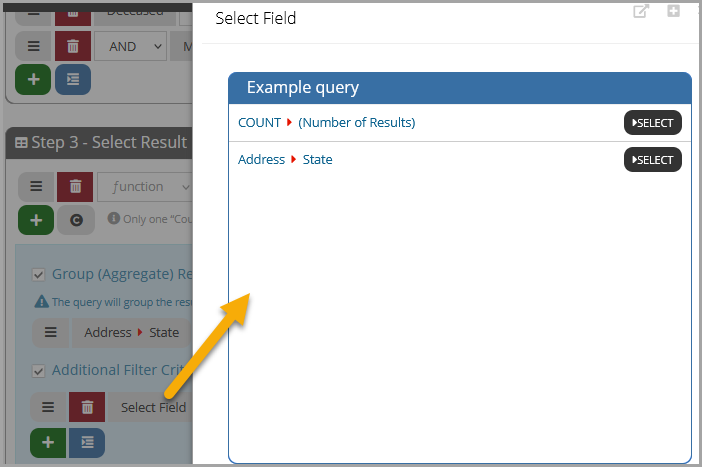
Click the Add icon
 . The Select Field option will appear.
-
Click Select Field to specify a filter field.
-
The Select Field window will appear.
-
-
In the Select Field window, choose a field to filter criteria. In this section, only the fields set up under Step 3 are selectable.
Note that, in scenarios where the Count > (Number of Results) field is enabled, this is also a filter option.
-
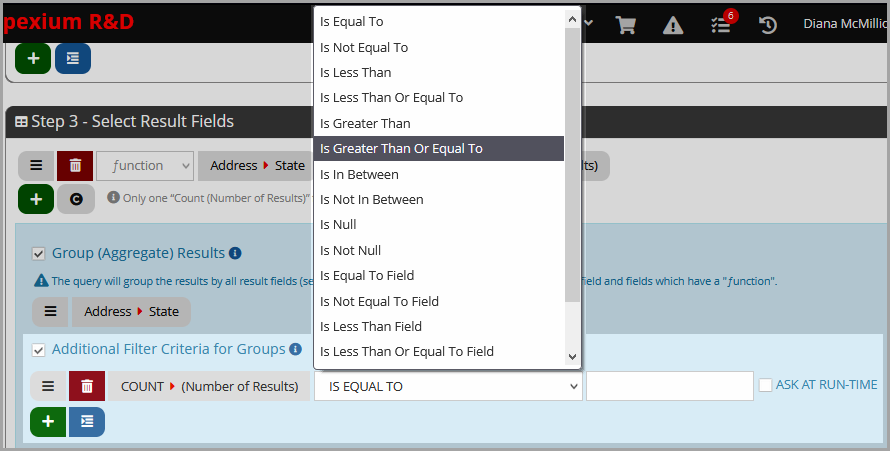
Once the field is added, click the operator drop-down next to that field to specify how the value should be filtered.
In the example below, the query is being configured to filter counts “greater than or equal to” a number. We can specify an exact value OR choose the Ask at Run Time function to allow the entry of a number when the query is run.
Use Cases
The following use cases offer examples of how the aggregate functionality can be used.
Use Case: List States Showing Number of Members by State
This scenario creates a query listing states as well as a count of members in each state.
-
In the Query Builder, Steps 1 & 2, create a query that pulls a list of active members.
-
Under Step 3, add the Address > State and Memberships > Is Member fields.
-
Click the Group (Aggregate) Results check box.
The system automatically sets all fields in Step 3 as “group by” fields.
-
Still in Step 3, choose which value should be counted by clicking the function drop-down field to the left of that value and selecting COUNT.
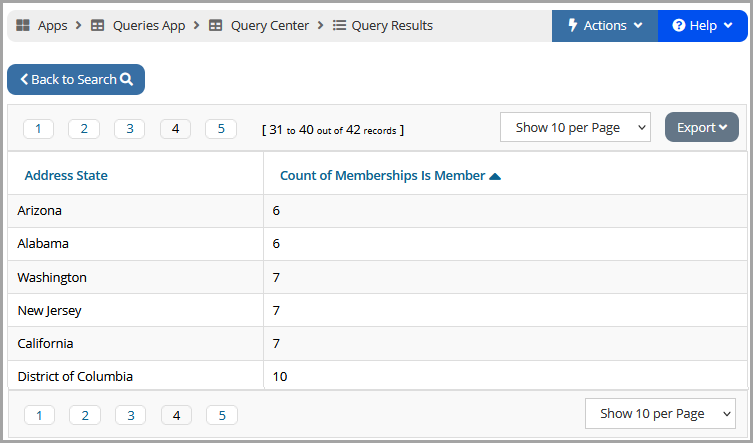
In the image below, results are set to group by Address > State and count by Memberships > Is Member.The query results will display a table listing states with a corresponding column displaying a member count next to each state.
-
Complete the query and click Save.
-
Run the completed query.
If fields in Step 2 of the Query Builder were set to “Ask at Run Time,” the user can view different aggregate results based on the values they search on. In the example below, the user can pull a list of members OR non-members by state by searching on Memberships Is Member = Yes or No.
In the result set pictured below, data is grouped by state in the Address State column and counted in the Count of Memberships Is Member column. As always, users can sort this data by clicking the column header.
Note: In the use case described above, the same result can be achieved by using the Add “Count Number of Results” Field instead. Using this configuration also includes null values in the results.
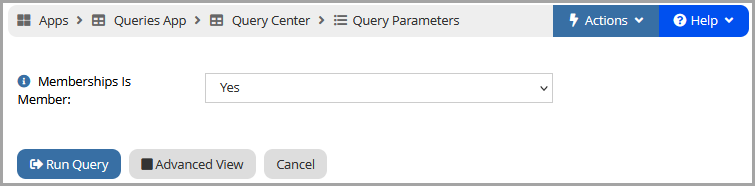
Use Case: Counting by Custom Field Value
This scenario creates a query listing a custom field value—in this case, “Shoe Size”—and the count of customers in the system matching values in that custom field. This configuration works well with drop-down custom fields, for example. It is not recommended for multi-select custom fields.
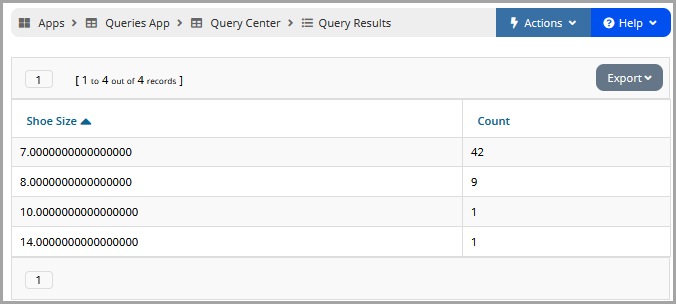
-
In the Query Builder, Steps 1 & 2, create a query that pulls a list of a custom field value.
-
Under Step 3,
-
Add the Custom Field set in Step 2.
-
Click the Add Count (Number of Results) icon to add the COUNT > (Number of Results) field.
-
As pictured below, results are set to group by the custom field value selected.
Use Case: Creating a Subquery Using Aggregate Configuration
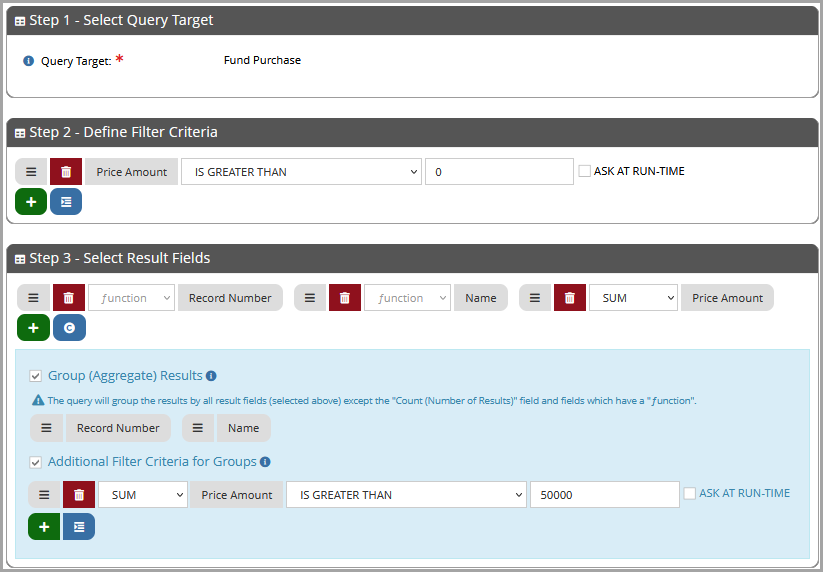
In this scenario, a query is created to find donors who have contributed more than $50,000 so they can be contacted.
Creating the Subquery Listing Donors Giving Over a Certain Amount
This subquery lists all customers who have donated more than $50,000.
-
In Step 1 of the Query Builder, set the Query Target to “Fund Purchase.”
-
In Step 2, using the Price Amount field, set this criterion to search for values greater than “0.”
-
In Step 3,
-
Add the Record Number and Name fields.
-
Click the Group (Aggregate) Results check box—all current result fields will be included under the Group (Aggregate) Results section.
-
Click the Additional Filter Criteria for Groups check box.
-
Under the Additional Filter Criteria […] section, click the Add icon and add the Price Amount field. Set this criterion to search for values greater than 50000.
-
-
-
Complete and Save the query.
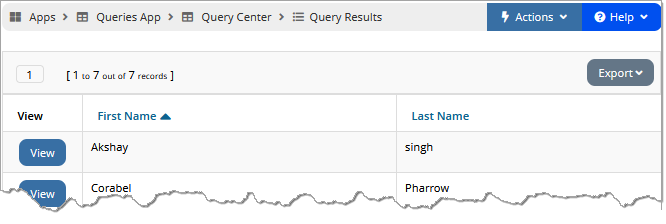
Creating a Donor List Using a Sub Query Configuration
-
In the Query Builder > Step 1, create a query using the Query Target, “Individual.”
-
In Step 2, configure a subquery field using the query created in the previous section, which pulled a list of donors over $50k.
-
In Step 3, set the result fields to display First Name and Last Name.
-
Save the query. When run, this query will simply list all members who donated over the amount indicated in the associated subquery.
Aggregate Query Limitations
At the time of the 2021.02 release, certain query fields cannot be used with the new aggregate grouping functionality.
These fields are not fields in the actual database but are fields calculated when the query is run: Impexium runs an expression to populate the virtual field with data each time the query is run.
This limitation will be addressed in a future release. Until that time, a list of affected fields appears below:
| Query Target | Join Within Query Target | Field Name |
|---|---|---|
| Advertiser | Advertiser | Name |
| Advertising Contract | Bill To Customer | Name |
| Customer | Name | |
| Award Nomination | Nominated By | Nominated By Name |
| Nominated By Membership | Is Member | |
| Nominee Membership | Is Member | |
| Certificant | Customer | Name |
| Membership | IsMember | |
| Membership | ReceivesBenefits | |
| Chapter | Organization | Parent Chapter Name |
| Chapter Members | Customer | Name |
| Committee Member | Contact Address | Bad Address |
| Membership | Is Member | |
| Membership | Receives Benefits | |
| Organization Membership | Is Member | |
| Contract | Individual | Individual Name |
| Course Registrants | Membership Benefit | Is Member |
| Membership Benefit | Receives Benefits | |
|
Credit |
Line Item Amount | Amount |
| Event Registrant | Account Header | Registrant Name |
| Assigned | User | |
| Committee | Parent Committee Name | |
| Membership Benefit | Is Member | |
| Membership Benefit | Receives Benefits | |
| Exam Registrants | Membership Benefit | Is Member |
| Membership Benefit | Receives Benefits | |
| Fund Purchase | Constituent | Name |
| Individual | Contact Address | Bad Address |
| Contact Address | Bad Address | |
| Directory Address | Region Code | |
| Membership | Is Member | |
| Memberships | Is Member | |
| Memberships | Receives Benefits | |
| Organization Address | Bad Address | |
| Product | Chapter Type | |
| State | USA And Canada State Code | |
| State Province | USA And Canada State Code | |
| User | Last Login Time | |
| Insertion Orders | Customer | Name |
| Invoice | Membership | Is Member |
| Members | Customer | Name |
| Membership Type | Price | Has Formula |
| Merchandise Purchase | Customer | Name |
| Opportunities | Individual | Owned By |
| Organization | Contact Address | Bad Address |
| Directory Address | Region Code | |
| Individual Address | Bad Address | |
| Membership | Is Member | |
| Memberships | Is Member | |
| Memberships | Receives Benefits | |
| Region | Is Region | |
| Related Individual | Related Relationship Sort Order | |
| Related Individual | Relationship Sort Order | |
| Related Individual Membership | Is Member | |
| Related Individual Membership | Receives Benefits | |
| Related Organization Membership | Is Member | |
| Related Organization Membership | Receives Benifits | |
| State | USA And Canada State Code | |
| PAC Purchase | Constituent | Name |
| Purchase | Billing State Province | USA and Canada State Code |
| Membership | Receives Benefits | |
| Order | Invoiced | |
| Related Individual | Relationship Sort Order | |
| Shipping State Province | USA and Canada State Code | |
| Request | Assigned | User |
| Session Registrants | Account Header | Registrant Name |
| Solicitor | Membership | Is Member |
| Speakers | Membership | Is Member |
| Membership | Receives Benefits | |
| Sponsor | Customer | Sponsor Name |
| Subscriber | Customer | Name |
| WriteOff | Customer | Customer Name |
| Line Item Amount | WriteOff Amount |
API’s
-
Update the Source Code field.
-
Create committee position
-
Create a new order
-
Update a Mailing List
-
Add a Contact to a Mailing List
-
Add a Job Role to an Individual
-
Get the list of Job Roles
-
Update an Individual License
-
Add a License to an Individual
-
Update an existing alias
-
Add alias to Organization
-
Get a list of aliases for an organization
-
Update an existing alias
-
Add alias to Individual
-
Get a list of aliases for an Individual
-
Update an existing Committee
-
Add a new Committee
-
Add/Update Contact to a Mailing List
-
Create a new Mailing List
-
List Mailing Lists